DLTK's Holiday Crafts for Kids
DIY Acrylic Paint Pen Golf Balls: A Unique Father's Day Gift
 Looking for a unique and heartfelt gift for Father's Day? Try creating custom painted golf balls using acrylic paint pens! It's not only a fun and engaging DIY project, but also a personalized gift that any golf-loving dad would appreciate.
These personalized golf balls are super cute but I wouldn't use the most expensive ones. They're great for practice on the putting green but the paint will throw off their aerodynamic perfection a little so dad won't want to use them when he's feeling competitive!
Materials:
- Plain white golf balls (You may need more than one depending on how many you wish to create.)
- Acrylic paint pens (These are available in a wide range of colors. Choose ones that you think your dad would like.)
- Clear acrylic sealer spray (This is to seal the paint once it's dry.)
- Wax Pencil (This is for sketching the design before using the paint pens.)
- Rubbing alcohol and cloth (For cleaning the balls before painting.)
- A newspaper or craft paper (To protect your working surface.)
- An egg carton or a similar object (To hold the golf balls steady while painting.)
 Instructions:
- Prepare Your Working Area: Spread out the newspaper or craft paper over your working surface to protect it from any accidental drips or spills.
- Clean the Golf Balls: Use the rubbing alcohol and cloth to thoroughly clean each golf ball. This will help the paint adhere better to the surface.
- Sketch Your Design (optional): Using your pencil, lightly sketch your design onto each golf ball. If you make a mistake, you can erase it and start again. Don't press too hard with the pencil, or you might damage the surface of the golf ball.
- Paint Your Design: Shake your acrylic paint pens well before using them. Follow your pencil sketch to paint your design onto the golf balls. Make sure you take your time during this process so you don't make mistakes. It's better to have thin layers of paint rather than thick ones, as they dry faster and look better.
- Let It Dry: Allow the paint to dry fully. This may take a few hours, but it's important to ensure the paint is completely dry before moving on to the next step.
- Seal the Paint: Once the paint is dry, spray a layer of clear acrylic sealer over the entire surface of the golf ball. This will help protect the paint and make it last longer. Follow the instructions on the can for the best results.
- Let It Dry Again: Allow the sealer to dry fully. This may take another few hours or even overnight.
- Check Your Work: Once the sealer is dry, check your work. If there are any spots you missed or aren't happy with, you can touch them up with the paint pens and repeat the sealing process.
Design Suggestions:
1. DAD in Bubble Letters
- Step 1: Use your pencil to sketch "DAD" on the golf ball. Remember to draw these in bubble letter style.
- Step 2: Once you're happy with the sketch, use your acrylic paint pens to trace over the pencil outline.
- Step 3: Fill in the letters with your chosen color(s) once the outline is dry.
2. 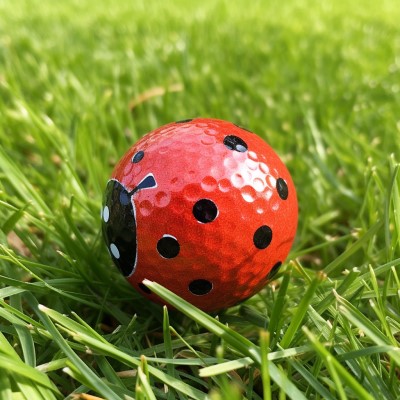 Ladybug
- Step 1: Consider the entire golf ball as the ladybug's body.
- Step 2: Draw a thin line with your pencil across the center of the golf ball to represent the division between the ladybug's wings.
- Step 3: Add a few dots on one half of the golf ball for the spots on the ladybug's wings.
- Step 4: Use your acrylic paint pens to fill in the spots and the line with black color.
3.  Smiley Face
- Step 1: Consider the golf ball as the face of the smiley.
- Step 2: Sketch two small circles for the eyes and a curved line for the mouth.
- Step 3: Use your paint pens to trace over the pencil, filling in the eyes and mouth.
That's it! You have your custom, hand-painted golf balls. This is a thoughtful and personal gift that your dad is sure to love for Father's Day. Remember, the most important part is to have fun while creating them -- your personalized golf balls might end up in a water hazard at some point so try not to get too attached to them!
Golf Ball Seeds >
Printable version of these instructions