DLTK's Holiday Crafts for Kids
 Painted Ornaments
Most crafts on the site don't really require you purchase any supplies to make them. But at Christmas, I usually do one or two crafts with the girls that require some supplies. These painted ornaments make wonderful gifts, were simple enough for my 3 year old but had a nice enough end result that my 7 year old loved them too.
Total cost of each completed ornament was about $1.
Before I start the instructions, I'll give you a bit of background. We are going to paint the INSIDE of the ornaments... You won't need paintbrushes or anything. This gives an intriguing result (grandma will wonder how it was done! and the kids will enjoy explaining the process). It also prevents any scratching of the paint -- these ornaments should last forever!
I would have preferred silver, gold, red and green ornaments (Christmas colors) *grin*, but the girls wanted pink and blue.
Materials:
- clear glass ornaments (ours were 50 cents Canadian from Walmart).
- acrylic paint -- we bought 5 bottles of paint in different colors, two metallic and three normal. This was enough for 20 ornaments and cost $10 Canadian. The metallic (the dark pink and dark blue in the photos) has a nice sparkle to it.
- newspaper to cover the table
Craft Instructions:
- acrylic paint does not wash out of clothes, so cover up or wear old clothes. If you do get some in the clothes, work on getting it out before it dries (acrylic paint dries in less than an hour so be quick).
- ADULT: take the top off the ornament. Just tug a bit until it's out about 1/4 way. There should be two extended wires that are holding the top on. Pinch those together and the top will come out the rest of the way very easily. Set it aside (don't lose it!). The kids can do everything else.
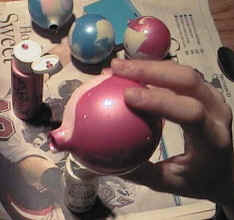 Squeeze 2 to 4 different colors of acrylic paint into the ornament.
Just squirt them all in there on top of each other -- they won't mix.
Start with a single squirt of each -- you can add more if you need to.
Squeeze 2 to 4 different colors of acrylic paint into the ornament.
Just squirt them all in there on top of each other -- they won't mix.
Start with a single squirt of each -- you can add more if you need to.
- Turn the ornament this way and that -- the paint will ooze around the ornament, coating it with a nice marbled effect. My girls had fun watching the patterns come out -- sort of like watching a lava lamp *grin*.
- My girls liked doing the ornaments one at a time and watching what happened. BUT, you can squirt paint into 4 or 5 ornaments and lie them on their side. Just rotate them ever minute or so and they'll do the rest.
- If the paint stops oozing, squirt a bit more paint in.
- Sometimes there'll be a stubborn spot that won't cover. Use paper towel or books to prop the ornament and lie it down so the spot is on the bottom. In about 5 minutes take a peek and you should see that it's covered up.
- Let the paint dry 24 hours before putting the top on (it takes awhile to dry because it isn't very exposed to the air). I just covered a cookie sheet with paper towel, put all the ornaments on it and stuck it on top of the fridge for a day.
- ADULT: put the top back on.
- Optional: string a ribbon through the top and tie it to decorate further.
Printable version of these instructions
Stephanie wrote:
"I once made these but used light bulbs. You can get generic light bulbs for way cheap
and they look really whimsical. I just haven't figured out a really
good way to attach a hanger. I glued a string of little tiny gold
pearl lace around the part that would screw in and made a U out
of craft wire and attached each end to the pearl ring. Then a ornament
hook can be attached to the U. I am sure there is a easier way for
this to be done. Then I sprayed them with a clear sealer when all done."
(Stephanie applied the paint to the outside of the light bulb and then used clear sealer to keep the paint from peeling or chipping off.)