DLTK's Holiday Crafts for Kids
 Knight's Shield paper mache craft
Our finished shield was about 12 inches x 15 inches (easy for a child to hold) but you can make yours any size your like. The gold edging and bolts around the shield are 3 dimensional and looks very realistic in real life.
We made ours a dragon shield, but you can sift through the coloring pages for many different images or design your own. I've included links to a few suggested images at the bottom of this page.
You can also check out the "Shield of Faith" craft (pictured to the right) for directions on how to put a 3 dimensional cross or letter in the center of the shield.Note: none of these shields are water proof!
 Materials:
- corrugated cardboard (old cardboard box).
- scissors (good strong ones!), case cutter or exacto knife.
- masking tape.
- newspaper.
- Paper Mache -- visit "How to Paper Mache" for the recipe.
- 8 sheets of toilet paper.
- Paint (poster or acrylic paint -- even old latex house paint would work)
- we used gold and black acrylic paint
- a grey, silver or white background would also be nice
- gold, silver, red or purple would all be good choices for the raised objects (border and bolts) -- though any color the child likes or you have on hand would work.
- paint brush,
- raffia, string or wool.
- toilet paper roll,
 Instructions:
- decide on the design for your project including the image you want in the center (dragon in our case).
- Make sure to make your shield large enough for the image (dragon) you have picked. The image should fit on the shield with about 4 inches around for the border and the bolts. I recommend printing your image out before you freehand draw your shield.
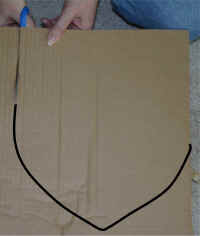
- Freehand draw the shield/mask shape on a large piece of cardboard.
- Cut it out.
 Here are some basic shield shapes:
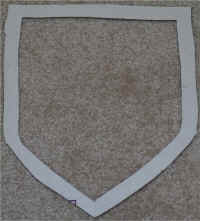 Making the 3D border:
- Trace your shield onto a second sheet of cardboard.
- Cut inside the line you traced about an inch or an inch and a half.
- draw another shield shape inside your cutout and cut that out as well (you can cut through the edges if you like as we'll be taping it onto the original shield).
- During this process, be aware of the size of the image you've picked (our dragon) It needs to fit inside the border you've created.
 use masking tape to attach the border to your shield.
- as I mentioned before, when making your border, it's ok to cut through it to get the center removed (if you are using scissors instead of an exacto knife, this will be how you have to do it). Just tape over any cut marks when you're attaching it to the shield.
 Paper Mache the shield (we just did the front side, but you can do
the front and the back -- I would suggest doing them in separate
sittings though or it may have trouble drying.
Paper Mache the shield (we just did the front side, but you can do
the front and the back -- I would suggest doing them in separate
sittings though or it may have trouble drying.- See our How to Paper Mache Activities for how to make paper mache mix and tips on applying it.
- Cover the shield with one or two layers of paper mache newspaper strips -- make sure you push the strips into the edges of the raised part so you don't lose the shape of your cross or letter.
-
 ok, everyone should have a roll of craft toilet paper *laugh* -- we
use it for all sorts of projects (including covering over paper mache
items with a white layer so they're easier to paint).
ok, everyone should have a roll of craft toilet paper *laugh* -- we
use it for all sorts of projects (including covering over paper mache
items with a white layer so they're easier to paint). - Anyways! take a sheet of toilet paper off the roll and scrunch it up.
- Dip the toilet paper in the paper mache paste and put it on the corner of the shield.
 Repeat with 7 more sheets, placing the "blobs" around the
shield with about even spacing. These blobs will be the bolts on the shield.
Repeat with 7 more sheets, placing the "blobs" around the
shield with about even spacing. These blobs will be the bolts on the shield.- Set your shield aside in a safe, preferably breezy, place to dry for 24 to 48 hours (the time it takes depends on the humidity in your area and the amount of mache you used).
 paint your shield the base color (in our case it was black).
- You can paint the entire thing, but then you have to wait until it's dry to do the second color -- we just painted around the 3D items (it isn't hard to do).
- Paint the raised parts of the shield your accent color (in our case it was gold).
- Let dry.
- Print and color your selected image (ours was a dragon).
- Cut out the image and glue it to the center of the shield.
-
 put a piece of string through the toilet paper roll and tie a loop.
 - Tape the toilet paper roll onto the back of the shield -- use lots of tape.
- you can hold the shield by the toilet paper roll or by the string.
Suggested Images for the Center:
- Dragons https://www.coloring.ws/dragons1.htm
- Eagle https://www.dltk-kids.com/animals/mbirdsposter2.html
- Knight https://www.coloring.ws/royalty.htm
- Lions https://www.coloring.ws/lions.htm
- Unicorns https://www.coloring.ws/unicorns1.htm
- Winged Horses https://www.coloring.ws/pegasus1.htm
Printable version of these instructions