DLTK's Holiday Crafts for Kids
Graduation Cap Craft

They grow up so fast!!!
Materials (for a full sized cap to fit a child):
- sheet of poster board in appropriate color (school colors)
- scissors,
- ruler
- stapler
- Optional: wool in an appropriate color (school colors)
Instructions:
- You can use white poster board and paint it an appropriate color, but I find the board curls a bit when painted. You're better off purchasing the poster board in the color you need.
 Measure out two equal sized squares onto the poster board. The
squares should be about 12" across.
Measure out two equal sized squares onto the poster board. The
squares should be about 12" across.- Cut out the squares.
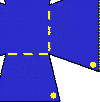
- Set one aside. On the other square snip triangles out of the corners to form a sort of cross shape as shown in the image to the right.
 Fold the sides of the cross (see yellow dotted lines in image).
- Staple the edges together where they meet (see yellow circles in the image).
- Repeat with the other sides to form a "cup shape" that the child will wear on their head.
 Staple or glue the square on top of the cup shape to form your grad
cap.
- Optional: Make a tassel with wool:
- Wrap a piece of wool around a 3 1/2 inch disk, your hand or a piece of cardboard about 20 times
- Tie a long piece of wool (about 24") through the loop
 Remove wool from base and tie a 4" piece of wool around the
loop you've made about 3/4" down from the top
Remove wool from base and tie a 4" piece of wool around the
loop you've made about 3/4" down from the top- Snip the ends at the bottom to form the tassel.
- Staple or tape the tassel to the cap
Printable Craft Templates:
- Close the template window after printing to return to this screen.
- Set page margins to zero if you have trouble fitting the template on one page (FILE, PAGE SETUP in most browsers).
Template (color) (B&W)
The template is about 1/3 the size you'll need for a child, but you can use it to make a cap for a teddy bear or use it to follow along when you're measuring.
Printable version of these instructions