DLTK's Holiday Crafts for Kids
 Necktie Paper Craft
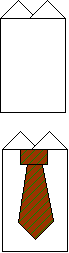
Print a message for dad on the back and use this paper craft as a substitute for a Father's Day card.
Materials:
- Scissors,
- Glue,
- White paper or card stock,
- Construction paper for the tie,
- Markers or crayons,
- Ruler
Directions
- For the basic part of the shirt cut one piece of paper five inches wide by eight inches long. White paper or cardstock will do or even gift wrapping paper with a design on it.
 Cut two squares that are two inches long by two inches wide from
the same paper as the shirt. Fold in
half to make triangles.
This will be your collar. Open them to be squares again, and glue 1/2 of them to the back
of the shirt paper so that when you fold them over the triangles form
a collar. There will be a slight overlap in the center. Do not put any
glue on the front part (yet).
Cut two squares that are two inches long by two inches wide from
the same paper as the shirt. Fold in
half to make triangles.
This will be your collar. Open them to be squares again, and glue 1/2 of them to the back
of the shirt paper so that when you fold them over the triangles form
a collar. There will be a slight overlap in the center. Do not put any
glue on the front part (yet).
- Cut a square that is about two inches by two inches out of construction paper. Fold it in half to make a rectangle. This will go under the collar to make the "knot" part of the tie. Do not glue it just yet!
- Cut a rectangle about seven inches long and three inches wide. Fold the bottom two corners up to make a point on your tie. Mark the top of the rectangle into 3 equal part (1 inch each) and draw a line from those marks to the lower corners to make a tie shape. Trim off all the extra.
- Put your "tie" together by sliding the hanging part under the knot part and gluing it. Position the tie at the top of the card glue it in place at the 'knot'. Do not glue the bottom part of the tie to the card.
- Fold the collar down. Now add a line of glue under the collar at the very top of the card to hold the collar down over the tie.
- Now is the time to use your markers to decorate the shirt. Lift the tie and draw a straight line down the middle for the front of the shirt and add your buttons. You can use markers or cut the "buttons" from construction paper.
To Use As A Father's Day Card
- Write a message on the bottom section of the tie like "Who is the greatest dad in the whole world?"" and decorate the tie and knot if you want to with your markers or crayons.
- After putting your tie together and gluing it, lift the bottom of the tie and write the answer to your question. ("You are!") Make sure this saying is covered by the tie. Don't forget to write "I love you" and your name.
Cut and paste for Toddlers
- Use Color templates and follow instructions above for gluing together.
Printable Craft Templates:
- After printing, close the template window to return to the main page.
- If the template doesn’t fit on one page, adjust your printer margins:
• In most browsers: Print → More settings → Margins → Minimum
• Or use Page Setup / Printer Setup in your printer dialog
Template (color) or (B&W)
Printable version of these instructions.