DLTK's Holiday Crafts for Kids
Scarecrow Paper Craft
 Have I mentioned how much I love drawing paper crafts. It's so much fun!
This little scarecrow is simple to make and comes in two sizes. The largest one is easier to cut out but makes a big scarecrow (you'll have to clear room on your fridge to hang him).
Materials:
- paper,
- printer,
- something to color with (B&W version),
- scissors,
- glue
Instructions:
- Print out the template of choice (you can mix and match the B&W and color versions if you want less coloring). You need all 4 templates to make a large scarecrow.
- Color the template pieces (if using the B&W version) -- feel free to use different materials for coloring to add creativity/personality to the project (paint, markers, pencils and crayons are all fun choices).
- Cut out the template pieces (young children may need help with this step).
- Glue the scarecrow together:
- Glue the neck ruffle to the body, right where the dotted line on the body stops.
- Glue the head onto the body right above the neck ruffle.
- Glue the hat onto the back of the head.
- Glue the hair onto the head, overlapping the hat a little.
- Glue the arms onto either side of the body.
- Glue the hands/mittens onto the ends of the arms.
- Glue the legs underneath of the body so the feet are sticking out.
- Glue the patches onto the body.
- Glue the buttons onto the body.
- Glue the sunflower and the crow on to decorate (I put the sunflower on the hat and the crow on one arm, but you can get creative if you like).
Templates:
- After printing, close the template window to return to the main page.
- If the template doesn’t fit on one page, adjust your printer margins:
• In most browsers: Print → More settings → Margins → Minimum
• Or use Page Setup / Printer Setup in your printer dialog
SMALL scarecrow template color or B&W
BIG scarecrow template #1 color or B&W
BIG scarecrow template #2 color or B&W
 BIG scarecrow template #3 color
or B&W
BIG scarecrow template #3 color
or B&W
BIG scarecrow template #4 color or B&W
Printable version of these instructions
Tip: Kaitlyn's teacher cut some of the pieces out of scraps of wallpaper and let the children color the arms, neck and face on their own.
That way the kids got a nicely decorated scarecrow that could be done in the time allotted for the project and the teacher didn't have to use a color printer!
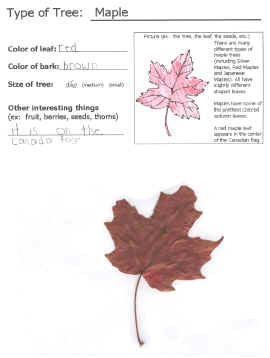 Autumn Leaf Collection Booklet