Bubble Painted Snowflakes Hanging Craft

I love bubbles so I couldn't resist creating a winter themed craft with bubbles. This is an adorable craft that is lots of fun to make and ends up with a really pretty winter decoration that you can hang from walls or off of shelves.
This craft is fun for all ages and is a great craft for individuals to spend an evening doing or a family or group of children to create together!
Materials:
- materials for painting with bubbles,
- scissors,
- clothing hanger,
- tape,
- string, thread, ribbon or wool
Instructions:
- Follow the instructions on how to paint with bubbles and paint as many pieces of plain white paper as you would like (the more you paint, the more snowflakes you will be able to make).
- Turn a plain piece of paper into two squares:
 hamburger fold the paper in half and rip or cut it along the fold
- fold the bottom right corner diagonally so that the two edges meet up
 you will be left with a strip at the top that needs to be cut off
- don't bother unfolding the square, keep the paper folded in the traingle shape so that you can start creating snowflakes
- Now make a snowflake:
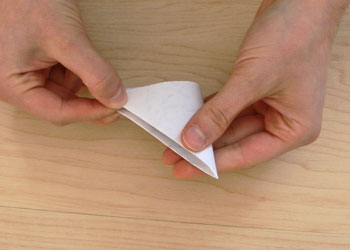 take the folded traingle and fold it in half two more times so that you are left with a very slim triangle
 Orient the traingle so that the long edge of the triangle is on the bottom, now cut a curved edge along the left edge of the folded trangle - this will make the snowflake a circle
 now cut different shapes in the snowflake to create different patterns
- IMPORTANT: Don't cut off the entire folded edges on either side because that will cause the snowflake to fall apart
- TIP: I like to cut a little shape right in the middle of the snowflake (on the tip) and a few simple shapes along each edge to make a simple but beautiful snowflake
 Continue to make several snowflakes. You can create each snowflake a little bit differently because no two snowflake is alike in real life.
- You can continue to make the snowflakes the same size, but if you want a bit of variation you can also use the leftover strips from the original piece's of paper to make smaller snowflakes. Just follow the same steps (starting with turning it into a square) with the strip of paper.
 Once you have a good collection of snowflakes tie snowflakes to a piece of wool by looping the wool through one of the holes in the snowflake and tying a loose double knot (try not to rip the paper).
- Now cut four pieces of string or wool. You can make the string as long as you would like depending on how you would like the hanging decoration to be.
- I like to tie several snowflakes to each section of string.
- When you are done making your snowflake strings, tie each string to the bottom of the clothing hanger.
- Tape a few snowflakes around the hanger as well.
 Now you can hang the winter decoration somewhere in your house. I like to use a hanger that can turn at the top because then I can hook the decoration off of a shelf or window sill.
- Just be cautious if you have pets... *giggle* We hung our decoration from a small counter and we came home to our kitty attacking our decoration, it was pretty adorable!
Printable version of these instructions