DLTK's Christmas Crafts for Kids
Other Christmas Craft Ideas From Our Viewers
Angel
Thanks
to Jennifer for sending this in!
Take an old readers
digest. Start by folding the top corner all the way down as far
as you can into the binding of the book making a large triangle.
Then fold the bottom corner up to meet the bottom of the top fold
making a small triangle. Do this for every page. When finished the
book will fan out making a circular base. Attach the front and back
pages with tape, glue or staples. Spray paint gold, white or whatever
color you want your angel to be. Next, take a styrofoam ball available
at most craft shops. The size of a head. Decorate it like a face
using glitter, beads, paint, pipe cleaners or whatever you want.
Take a pipe cleaner and create a halo out of it. Attach the head
to the readers digest body or base. Using pipe cleaners and tissue
paper make angel wings, bending the pipe cleaners to form the wings
and attaching tissue paper to the inside. Glue to the back of the
angle. Add arms using pipe cleaners and there you have a fun easy
and inexpensive project for kids to enjoy. I made these when I was
a child in school and loved doing them.
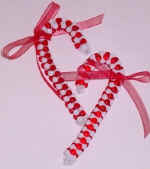 Candy Cane Craft
Thanks to Cheryl for
sharing this idea with us!
I'd like to offer another
Christmas ornament idea. My children ages 2 and 4 did these unassisted
Materials:
white or red pipe cleaner, tri-tip beads in red and
white, ribbon, scissors
Directions:
Cut the pipe cleaner
in half and bend the bottom twice to keep the beads from slipping
off. Thread the beads, alternating between red and white.
Bend the pipe cleaner again when full. Create a candycane
by shaping. Tie a holiday colored ribbon.
Christmas Wreath
Thanks to Jennifer for sending this in!
Take a
wire coat hanger and stretch it out to be a circle leaving the hook
of the hanger in tact as this will be a way to display the project
after completed. Using plastic garbage bags start cutting them into
small strips. Different colors of trash bags are fun and have an
interesting outcome. Start tying the strips onto the coat hanger.
Push the tied strips as close together as possible to ensure that
the wreath will be full and attractive. Add decorations when finished
to adorn your wreath. For example you could use some pine cones
hither and yon for appearance. Attach these using a garbage bag
twist tie. Tie it around the middle of the cone then around the
coat hanger wire. Bows available most anywhere this time of year
are fun too!! Enjoy!!
Cinnamon Ornaments
Thanks to Susan for sending this in!
Cut apple
or star shapes out of sandpaper and rub them with a cinnamon stick.
Attach ribbon or yarn. These make great tree ornaments for
Christmas.
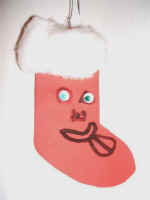 Happy Stocking Ornament
Thanks to Vanessa for sending this in!
Use the
4 stocking template (see links at the bottom of the page) from
your website. Cut the stocking out of RED foam sheets. (Could directly
print onto construction paper and cut out also). Glue cotton
balls to make the top white of the stocking. Then use the
plastic eyes that move (or draw eyes with a marker)....then use
a marker to make a nose and mouth. Insert a ribbon or metal
hook in a small hole on top of the ornament (hidden by cotton balls)
to hang on your tree. I printed a picture of my child to glue
on the back and dated it with a black marker....we have one on our
tree and are giving them to grandparents.
Paper Mache Santa
Thanks to Jennifer for sending this in!
Blow up
a medium to large round balloon and place on top of a large coffee
can. (must be inflated large enough to set on top of the can)
Make
a mixture of flour and water for paper mache. Take an old news
paper and rip into strips. Start dipping the newspaper into the
paper mache mixture and placing on the balloon. Cover the entire
balloon and make sure to extend some onto the can to ensure the
balloon is connected to the can. Wait for this to dry. Once dry
start decorating your Santa. First paint the head (the balloon part)
with a flesh colored paint. Let dry. Take a piece of red construction
paper and wrap around the body (the coffee can) Using cotton balls
and construction paper make Santa's suit and hat. Adorn his face
with the decorations of your choice. Using two strips of red construction
paper fold them back and forth repeatedly. Connect to the body for
arms. Put little cut out mittens on the ends of the arms.
Paper Plate Santa
Thanks to Twila for sending this in!
You need
a paper plate, school glue, cotton balls, red construction paper,
and a black and red marker. Cut a triangle as large as possible
from the red construction paper -- go from top to bottom making
a tall triangle. This will be the hat. Glue it on the top front
of the paper plate rim. Use the markers to draw a nose, eyes
and mouth on the top half of the plate. Then along where you
glued the hat on, run a line of glue. Start sticking cotton
balls on the glue. This is the bottom of his hat. Use
1 to 2 cotton balls and glue them to the top point of the hat.
Then run glue all along the bottom half of the plate and start sticking
cotton balls like crazy. The whole bottom half of the plate
is his beard. Fill it up with cotton! Then run a small line
of glue and cotton balls above Santa's lip, for a mustache. You
can hang this on your door or on the wall.
Phone Book Christmas Tree
Thanks to James for sending this in!
Take a phone book - it has to be real thick phone book though.
Start with the cover and take the right upper corner and fold into
a triangle to the left and repeat until every page is done and then
press carefully the back folded cover with the front folded cover
and staple them together. Fluff out the pages and spray paint
the whole thing green until all you see is a green folded book.
Take many of 5 inch pieces of yarn (color is optional) and glue
them in a circular formation around the book. Take cotton
balls dip them in paint (color optional) and glue them around the
book. Now you have a Christmas phone book! (NOW SANTA
HAS THE ADDRESS OF ALL GOOD LITTLE BOYS AND GIRLS)
Desk Snow Globe
Thanks so much to Linda for sharing this idea with us.
Linda wrote: "I teach four and five year old children in a
privately owned Christian learning center. Just thought you
might like to know what we did for Christmas gifts to parents."
Materials:
Spray Paint (Dark Green or Gold are nice), Clean
baby food jar, Floral Clay, Glitter, Foil Figurines
Instructions:
Spray paint baby bood jar lids. I had a dark
teal green so I used that. Gold would be pretty.
Used a
little floral clay inside lids. The children liked spreading it
around inside the rim.
Sprinkle some glitter and some foil
figurines and fill with water.
Click here for more craft ideas from our viewers!