 DLTK's Holiday Crafts for Kids
Mother's Day Stained Glass Craft
Use this as a craft you can hang in your window or make it as a card for your mom. There is an option at the bottom for younger kids, instead of melting crayons.
Materials:
- waxed paper,
- wax crayons (Crayola don't work as well as the cheap kind for this project, though they do still work)
- manual pencil sharpener (with a fairly large hole)
- iron, ironing board and scrap paper (white computer paper or brown paper bag)
- construction paper,
- scissors,
- glue stick or white glue.
Instructions:
- ADULT: Plug in the iron and cover the ironing board with scrap paper. Set the iron to medium (no steam).
- Tear a piece of waxed paper that's square (or a bit longer than it is wide) and fold it in half. Then unfold.
 Take the paper off some crayons and 'sharpen' them in the pencil
sharpener. Let the shavings drop onto 1/2 the waxed
paper.
Take the paper off some crayons and 'sharpen' them in the pencil
sharpener. Let the shavings drop onto 1/2 the waxed
paper.- Feel free to use whatever colors you would prefer. You don't have to completely fill the space, it will spread about a bit when you use the iron.
- When you have a nice pile of shavings refold the waxed paper.
- Fold about 1/2 inch around all the edges so none of the wax leaks out when you iron.
- Place the waxed paper containing the shavings down on the ironing board and cover with more scrap paper.
 Iron for a few seconds. Peek and iron a bit more if
necessary. All the wax should melt. If you used multiple
colours the longer you iron, the more your colors will mix.
Iron for a few seconds. Peek and iron a bit more if
necessary. All the wax should melt. If you used multiple
colours the longer you iron, the more your colors will mix.- You'll find that nothing happens, nothing happens, nothing happens and then BAM it's totally melted, so just keep waiting a few seconds at a time and peeking so you don't burn anything.
- Let it sit about a minute to cool.

 Fold a piece of construction paper in half and then in half again.
- Don't crease very much (the less you crease it the better, but young children may need it creased quite well).
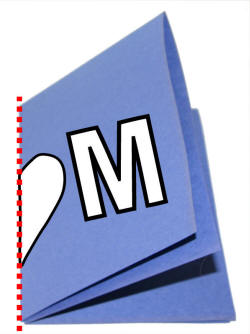 Print the template (link below) and cut out the letter M and
the half heart shape.
Print the template (link below) and cut out the letter M and
the half heart shape.- Line up the flat edge of the half heart shape with the folded edge of the construction paper. Trace the half heart shape onto the construction paper and then place the letter M beside it and trace it also. Cut out the half heart and the letter M.
- Unfold the last fold of the construction paper and you'll see the letters M O M in the middle.
- Unfold the construction paper again and put glue around the cut
out letters. Put your waxed paper ("stained glass")
onto the glue and cover the cut out letters.
- Put glue around the cut out letters on the other half of the construction paper and fold it over so the 'stained glass' is sandwiched between the construction paper.
Optional:
Thanks Geri for sending this in!
"Have the kids color a picture with crayons. They can color dark or light - it doesn't matter but
the darker sometimes looks better. They really do look like stained glass pictures, especially if the picture had heavy black
lines."
- Use crayons, NOT markers or colored pencils.
- Have a few bowls with a VERY small amount of cooking oil and a couple of cotton balls in them.
- Have the kids flip the pages over and slowly and thoroughly rub the cotton balls on the paper. (You'll see the paper turn transparent and the colors come through).
- Put them aside to dry (usually doesn't take long)!
- Cut them out and either hang them as is with a hole punched in them or frame them with construction paper.
Optional:
Thanks Terri for sending this in!
"I have done for this to make it more suitable for younger kids. Instead of using wax paper and melting
crayons..."
- Use clear Contact Paper and tissue paper pieces.
- Put Contact Paper piece sticky side up on the table (may need to tape it down).
- Let kids stick tissue paper pieces to the sticky paper
- Cover with another piece of Contact Paper sandwiching the tissue in between.
- Frame with dark construction paper as directed for the melted crayon version.
Templates:
- After printing, close the template window to return to the main page.
- If the template doesn’t fit on one page, adjust your printer margins:
• In most browsers: Print → More settings → Margins → Minimum
• Or use Page Setup / Printer Setup in your printer dialog
Template
Printable version of these instructions